Best Autodesk Inventor tips and tricks - Shortcuts
Latest posts
-
 BEST AUTODESK INVENTOR TIPS AND TRICKS - SHORTCUTSRead more
 -
 HOW TO CREATE A PERSONALIZED TITLE BLOCKRead more
How to create a personalized title block with Autodesk Inventor
-

Blog categories
Search in blog
Archived posts
HOW TO CREATE A PERSONALIZED TITLE BLOCK
The quickest way to create a new title block with Autodesk Inventor is to start with an existing one and modify it to suit your needs. For that, you can start from the default Inventor titleblock or download one that better suits your needs (recommended option)
On the www.inventorprotools.com website, you can find pre-created templates with titleblocks and styles. Choose the one that best suits your needs. In addition, the templates already come with the drawing styles according to the titleblock style, and complies with ISO standards. As well as optimized to minimize the HD size of the files. With an optimized template like the ones from www.inventorprotools.com you can save up to 40% of disk space storage.
1- First of all, you have to open a new .IDW document, or a document that contains a predesigned titleblock. You can download a clean and optimized titleblock by clicking here.
From the left menu of drawing properties, on the tab Model -> Drawing Resources -> Titleblock, right-click on the titleblock to be modified and click on Edit.

2 - Once you have accessed in the titleblock editor, adjust the grid according to your needs using the sketch editing tools. You can change the thickness of the lines by right-clicking on them and selecting Properties...
3 - With the grid adjusted, you can now enter or modify the text boxes. There are different types of it, depending on where they get the information.
Static text: It is a text created when designing the titleblock and will always be the same. You can create it with the Text tool ![]() .
.
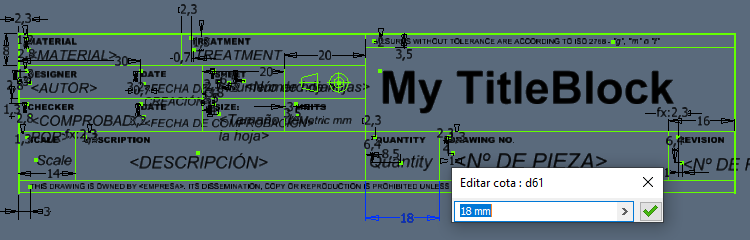
User-entered text: This is a text that, when you insert a new titleblock in a document, will display a dialog box asking you what value it should have. You can also change its value after inserting the titleblock from Model -> Sheet-> TitleBlock-> Text Field.
To create it, insert a text box with the text tool ![]() . Write the description that it should have and that will be displayed when prompted for the value. In the text type drop-down, select Requested Entry and press the Add Parameter button
. Write the description that it should have and that will be displayed when prompted for the value. In the text type drop-down, select Requested Entry and press the Add Parameter button ![]() .
.
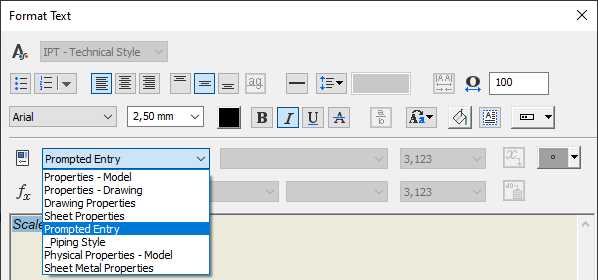
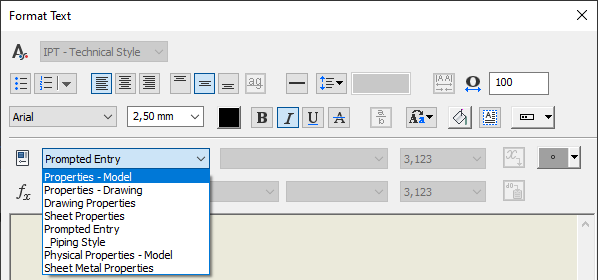
Properties text: It is a text that takes its value from the document properties, it can take it from both the .IDW drawing file or the inserted 3D .IPT
To create it, insert a text box with the text tool ![]() . Then, in the drop-down type, select Model Properties to take values from the first .IPT you inserted or Drawing Properties to take the properties from the IDW file. Then select the property and press the Add Parameter button
. Then, in the drop-down type, select Model Properties to take values from the first .IPT you inserted or Drawing Properties to take the properties from the IDW file. Then select the property and press the Add Parameter button ![]() .
.
Posted in:
Default category
Related posts
-
FOLDING TECHNICAL DIN-A DRAWINGS
FOLDING LARGE FORMAT TECHNICAL DIN-A DRAWINGSRead more
-
BEST AUTODESK INVENTOR TIPS AND TRICKS - SHORTCUTS
Best Autodesk Inventor tips and tricks - ShortcutsRead more
Leave a comment